To update practice and contact details:
| 1. | From the left menu items, click Administration > Setup > Practice. The Practice Management screen is displayed with Practice Details section and Contact Details section. |
*Note: The Practice Management screen can also be accessed by clicking the Admin icon  on the top of the main screen.
| 2. | Click the edit icon  corresponding to the Practice Name. corresponding to the Practice Name. |
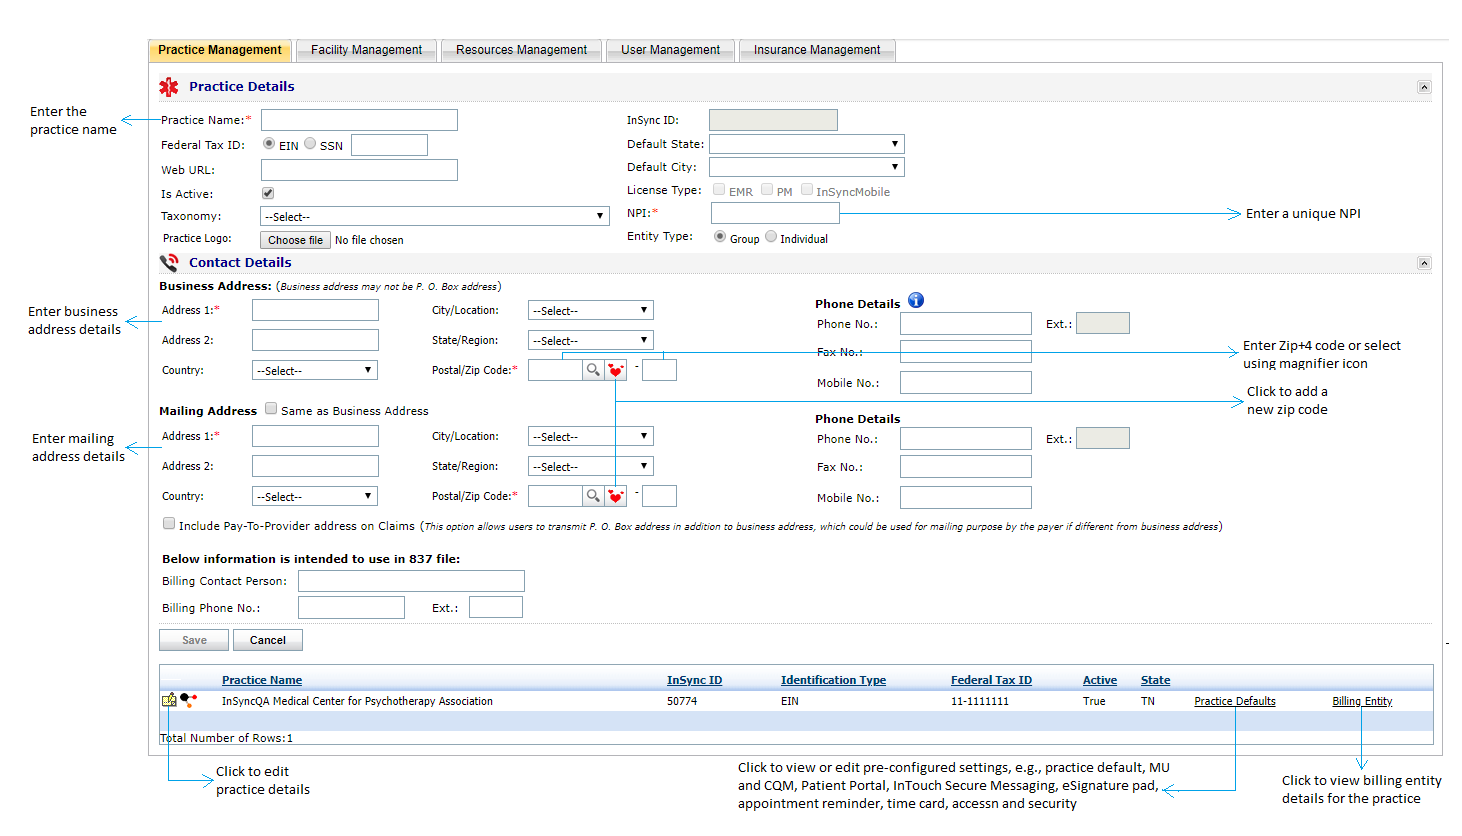
| 3. | In the Practice Details section, edit the following details, if necessary: |
| • | Edit the Practice Name. This field is mandatory. |
| • | Select the Default State from the drop-down list. |
| • | Enter the Federal Tax ID by selecting the option as EIN or SSN. |
| • | Select the Default City from the drop-down list. The drop-down list is populated based on the State selected. |
| • | Select the License Type to keep a track on the practice details as EMR, PM, or InSyncMobile . |
| • | The Is Active check box is selected by default. Deselecting this check box will disable the practice, and the users will not be able to log in to the application. |
| • | Enter a unique identifier in NPI. This field is mandatory. |
| • | Click Browse to browse for a Practice Logo and attach it to the practice. This logo will be printed on Encounter note. Based on the configuration in the customized referral and consultation letters, the logo will be printed on referral and consultation letters as well. |
| • | Select the Entity Type as Group or Individual option. This field is required for PM users. |
| • | Select the Taxonomy from the drop-down list. This field is required for PM users. |
| 4. | In the Contact Details section, edit the following details in Business Address, if necessary: |
| • | Enter the address in Address 1 and Address 2. Address 1 is mandatory. |
| • | Select the Country as United States or Canada from the drop-down list. |
| • | Select the State/Region from the drop-down list. |
| • | Select the City/Location from the drop-down list. |
| • | Enter the Postal/Zip Code (5-digit) or select the zip code using the  icon. Once the zip code is selected, the corresponding city and state will be auto-populated. You can add a new zip code by clicking the icon. Once the zip code is selected, the corresponding city and state will be auto-populated. You can add a new zip code by clicking the  icon. In addition to the 5-digit zip code, an additional 4 digits can be entered in the Text field nearby. icon. In addition to the 5-digit zip code, an additional 4 digits can be entered in the Text field nearby. |
| • | Enter the relevant information in Phone No., Extn., Fax No., and Mobile No. fields. |
| 5. | Select the Same as Business Address check box if the mailing address is the same as the business address entered. |
| 6. | If the mailing address is different, edit the following details in Mailing Address, if necessary: |
| • | Enter the address in Address 1 and Address 2. Address 1 is mandatory. |
| • | Select the Country as United States or Canada from the drop-down list. |
| • | Select the State/Region from the drop-down list. |
| • | Select the City/Location from the drop-down list. |
| • | Enter the Postal/Zip Code (5-digit) or select the zip code using the icon. Once the zip code is selected, the corresponding city and state will be auto-populated. You can add a new zip code by clicking the icon. In addition to the 5-digit zip code, an additional 4 digits can be entered in the Text field nearby. |
| • | Enter the relevant information in Phone No., Extn., Fax No., and Mobile No. fields. |
| • | Select the Include Pay-To-Provider address on Claims if you wish to transmit a P.O. Box address in addition to Business Address. This is useful for PM users. |
| • | Enter the name of the person to be contacted for billing, along with the phone number and extension. These fields are required for PM users and the information recorded here is intended to use in 837 file. |
| 7. | Click Save to save the details. |
| Note: To show mailing address in UB04 paper claims select the "Include Pay-To-Provider address on Claims" check box. |