The practice’s default settings are preconfigured in the system. Whenever required, you can change these settings to suit your need.
To change practice default settings:
| 1. | On the Practice Management Screen, click Practice Defaults corresponding to the practice. The Practice Defaults screen is displayed. |
| 2. | On the Practice Defaults screen, do the following: |
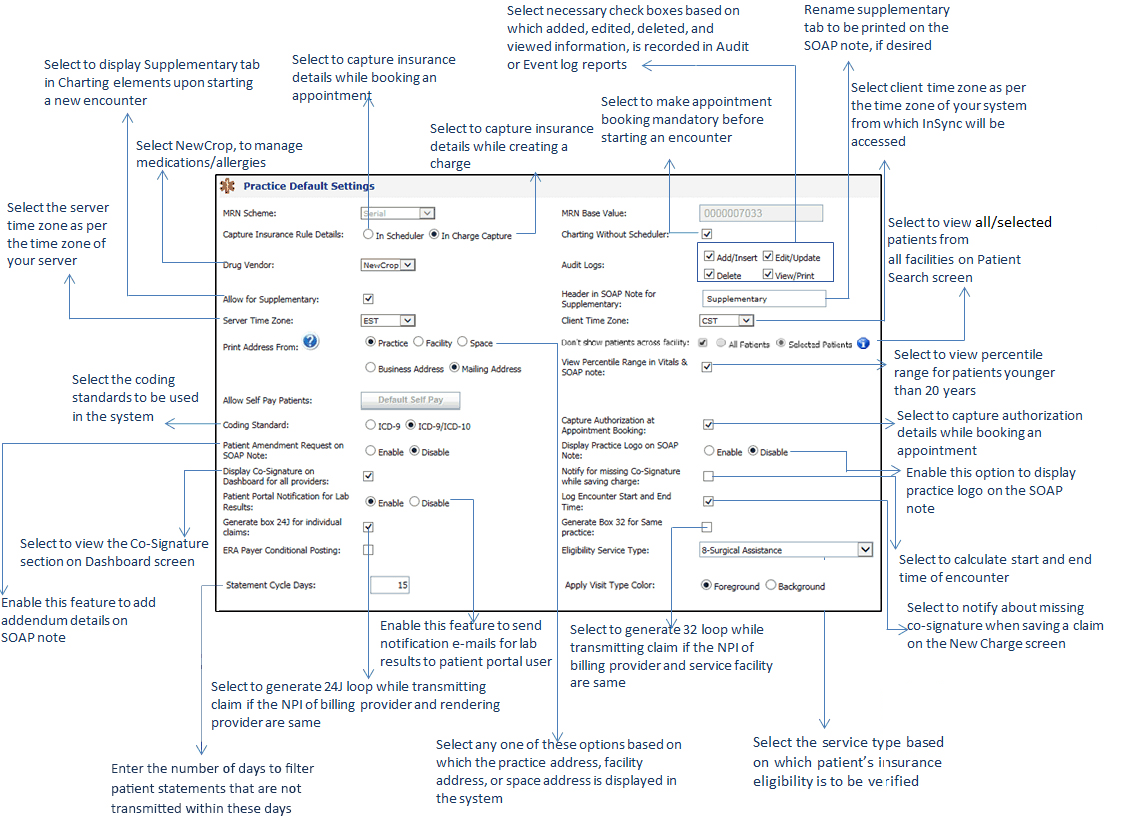
| • | MRN Scheme: The MRN Scheme value is preconfigured in the system. |
| • | MRN Base Value: The MRN Base value is preconfigured in the system. |
| • | Charting Without Scheduler: To start an encounter without booking an appointment, keep the Charting Without Scheduler check box deselected. When this check box is selected, it will be mandatory to book an appointment before you start an encounter. |
| • | Start Encounter without Encounter pop up: When checked " Start Encounter" pop up will not appear while starting an encounter from calendar view . However, this setting can be overridden from the scheduler, which will be instance specific. |
| • | Drug Vendor: Select the Drug Vendor from the drop-down list. InSync is compatible with NewCrop, which is a third party vendor for managing medications and allergies. |
| • | Audit Logs: In the Audit Logs section, select the Add/Insert, Edit/Update, Delete, and View check boxes to maintain the audit logs. Whenever any record is added, updated, deleted, or any screen is viewed, audit logs will capture that information in the system, and it can be viewed in Audit or Event Log Reports. |
| • | Allow for Supplementary: Select the Allow for Supplementary check box to display the Supplementary tab in the Charting elements upon starting a new encounter. |
| • | Header in Encounter Note for Supplementary: The Supplementary tab can be renamed as desired by you to print it on the Encounter note. |
| • | Server Time Zone: Select the Server Time Zone as per the time zone of your server from the drop-down list. |
| • | Client Time Zone: Select the Client Time Zone as per the time zone of your system from which InSync will be accessed from the drop-down list. |
| • | Don't Show Patients across facility: Select to view all the patients across a particular facility. You can allow access to view either all patients or selected Patients. |
| • | Print Address From: There are several places in the system where the address is displayed in header. They are Consultation Letter, Health Information Report, History Summary, Medication Report, Patient Education Material, Print Order (Treatment Plan), Print Prescriptions (Supplementary), Referral Letter, Encounter Note, and View Plan Summary (Treatment Plan). The system provides an option to choose which address you want to display. You can show the practice’s business or mailing address, the facility’s business or mailing address, or the space’s address in header. |
| • | Dont show Patients Across Facilities: Selecting this check box will not display all the patients on the Patient Search screen, irrespective of which facility you are logged in. If this check box is deselected, only the patients of the facility in which you are logged in will display. |
| • | Keep EPIN Mandatory for Signature: When ending an encounter you can enable the user to enter the EPIN for signature. |
| • | Allow Self Pay Patients: On clicking Allow Self Pay Patients, default insurance for a patient will be created after which the button will become disabled. This is useful for PM users. |
| • | Coding Standard: Select the Coding Standard (ICD-9 or ICD-9/ICD-10) that you want to use in the system. Based on the selection, either ICD-9 codes or ICD-9 and ICD-10 codes are displayed. If the ICD-9 option is selected, only ICD-9 codes can be searched from charting and administration sections; otherwise, both codes can be searched. |
| • | Capture Authorization at Appointment Booking: Select this check box to capture the authorization details while booking an appointment. |
| • | Patient Amendment Request on Encounter Note: To enable the Patient Amendment Request feature, select the Enable option. This helps you to enter the addendum details in the Addendum panel. For closed encounters, this helps you to enter the addendum details along with amendment request details in the Amendment Request/Addendum panel. |
| • | Display Practice Logo on the Encounter note: To display Practice Logo on the Encounter note, select Enable. |
| • | Display Co-Signature on Dashboard for all providers: To view the Co-Signature section on the Dashboard screen, select this check box. This helps you to view the list of all the Encounter notes that are assigned for Co-Signature and co-sign them. |
| • | Notify for missing Co-Signature while saving charge: To notify about missing co-signature when saving a claim on the New Charge screen, select this check box. This message will prompt only when the claim is being created for the encounter which has been ended by a junior provider (the provider for whom the Enforce Co-Signature Request check box is selected on the Resource Manager screen.) |
| • | Patient Portal Notification for Lab Results: To send notification e-mails for lab results to the patient portal user, select Enable. |
| • | Log Encounter Start and End Time: Select this check box to record the encounter start and end time based on which the total time spent by the provider with patient can be measured. |
| • | Generate box 24J for individual claims: Select this check box to generate the 24J loop while transmitting the claim if the NPI of billing provider and rendering provider are same. This is useful for PM users. |
| • | Generate Box 32 for Same practice: Select this check box to generate the 32 loop while transmitting the claim if the NPI of billing provider and service facility are same. This is useful for PM users. |
| • | ERA Payer Conditional Posting: Select to provide ERA Payer with conditional posting. |
| • | Statement Cycle Days: Enter the number of days to filter the patient statements that are not printed or transmitted within these days. It should not exceed 120 days. You can change the number of days on the Patient Statement screen. This is useful for PM users. |
| • | Eligibility Service Type: Select the service type based on the practice’s specialty which is applicable to all the patients when verifying insurance eligibility when adding new insurance. |
| 3. | Click Save at the bottom of the screen to save the changes. |