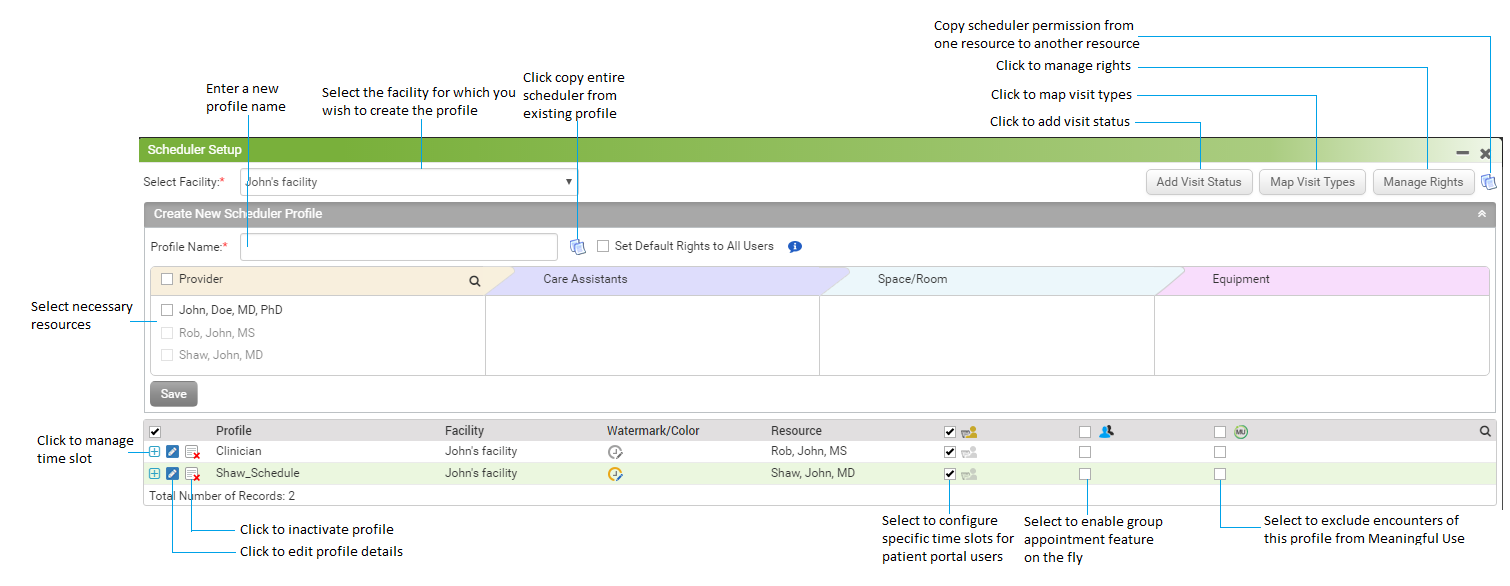
This section allows creating new scheduler profiles.
To create a new Scheduler Profile:
| 1. | Enter the new profile’s name in the Profile Name field. |
| 2. | Select the Facility to create the profile for, from the drop-down list. |
| 3. | Click the copy icon  to copy the scheduler permission from one resource to another resource. to copy the scheduler permission from one resource to another resource. |
| 4. | Select the Resources to apply the profile to. The providers for whom the schedules are already configured will appear as disabled. |
*Note: Only resources assigned to that facility will display for the user to select from.
| 5. | You can add new visit status type and map this status type with any of the existing visit statuses by clicking on the "Add Visit Status" button. |
| 6. | You can assign View/Add/Edit/Delete rights to both Schedulers and Resources by clicking on the "Manage Rights" button. |
| 7. | Select Allow from portal check box to allow patient portal users to book appointment for the unavailable time slots. You can configure the available time slot by clicking the  icon. icon. |
| 8. | Click the icon .png) to add Additional Watermark / Slot Color for that profile. to add Additional Watermark / Slot Color for that profile. |
| 9. | Select On the fly Group Appt. check box to book a group appointment on the fly in the selected profile for any available time slot, without having preconfigured group. For e.g., To book an on the fly group appointment, once first appointment is booked in any slot, you can click on the slot which opens up the context menu, where you can find a new option called 'Add more patient', to book an appointment over the same slot. By doing this the set of appointment, is converted into a group appointment, post which everything will work as per the standard InSync Group Appointment. |
| 10. | When you select Exclude from MU check box, all the encounters started from the Scheduler will default to 'exclude from Meaningful Use'. |
| 11. | Click the copy icon to copy any of the existing provider profile to new provider(s). |
| 12. | Select the "Set Default Rights to all Users" check box next to the Profile Name. When this check box is selected, all the practice users will be able to access this schedule. |
| 13. | Upon entering all relevant details, click the Save button to save the scheduler profile. |
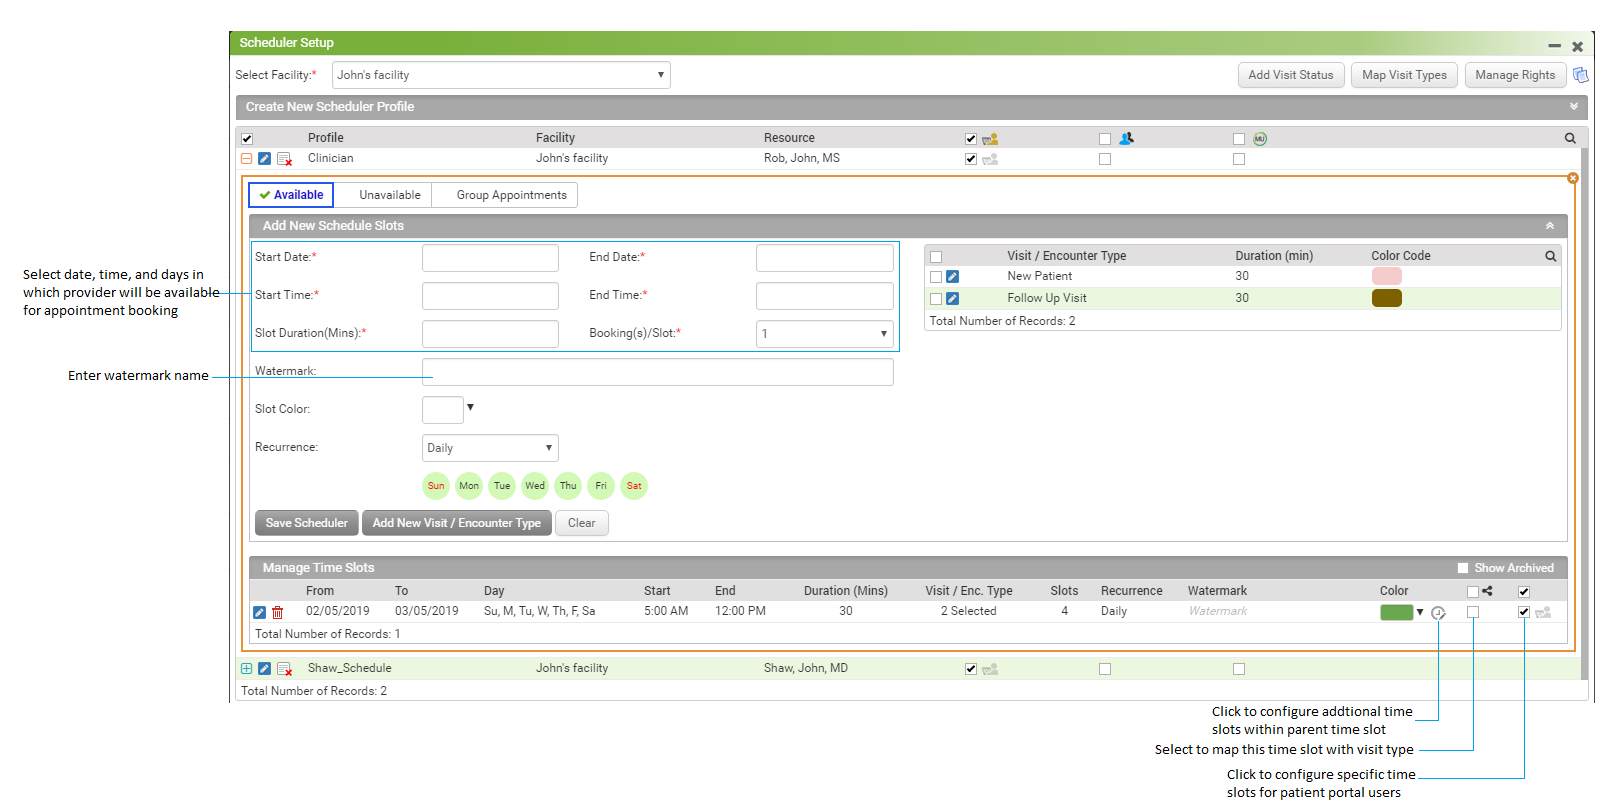
To configure a new Scheduler Profile:
| 1. | Click the manage time slot icon  of the newly created profile from the grid. of the newly created profile from the grid. |
| 2. | Select the Start/End Dates from the calendar. |
*Note: Users should set this date far enough in advance so that they don’t have to frequently edit the Scheduler.
| 3. | Select the hours to include in the schedule using the Start/End Time drop-down menus. |
| 4. | Enter the Slot Duration in minutes. This dictates the length of individual time slots on the Scheduler (e.g., type in “15” to set the duration of a standard appointment slot as 15 minutes). |
| 5. | Select the number of bookings that can be made for a single time slot using the Booking(s)/Slot drop-down menus. |
| 6. | Enter a watermark name to create a color coded template with name that can be booked over when scheduling. |
| 7. | Select the slot color from the color palette. |
| 8. | Select the recurrence type from the drop-down & select the days of the week to include in the schedule by clicking days icons. |
| 9. | To save scheduler details, the user must select Visit Types. Each Visit Type displayed here will have a description, duration, and color code associated with it. To include a particular Visit Type in the schedule, click in the appropriate check boxes next to the Visit Types. |
| *Note: Select the check box at the top of the column to select all Visit Types listed. |
| 10. | Click the Add New Visit/ Encounter Type button to add new visit/encounter types. |
| 11. | Upon entering all relevant details, click Save Scheduler to save the details. |