Immunizations for adult patients can be added from this section based on the immunization type and age range. These immunizations can also be configured based on the single or multiple parameters from the Diagnosis Codes. The configured adult immunizations are displayed in charting.
To configure the adult immunization:
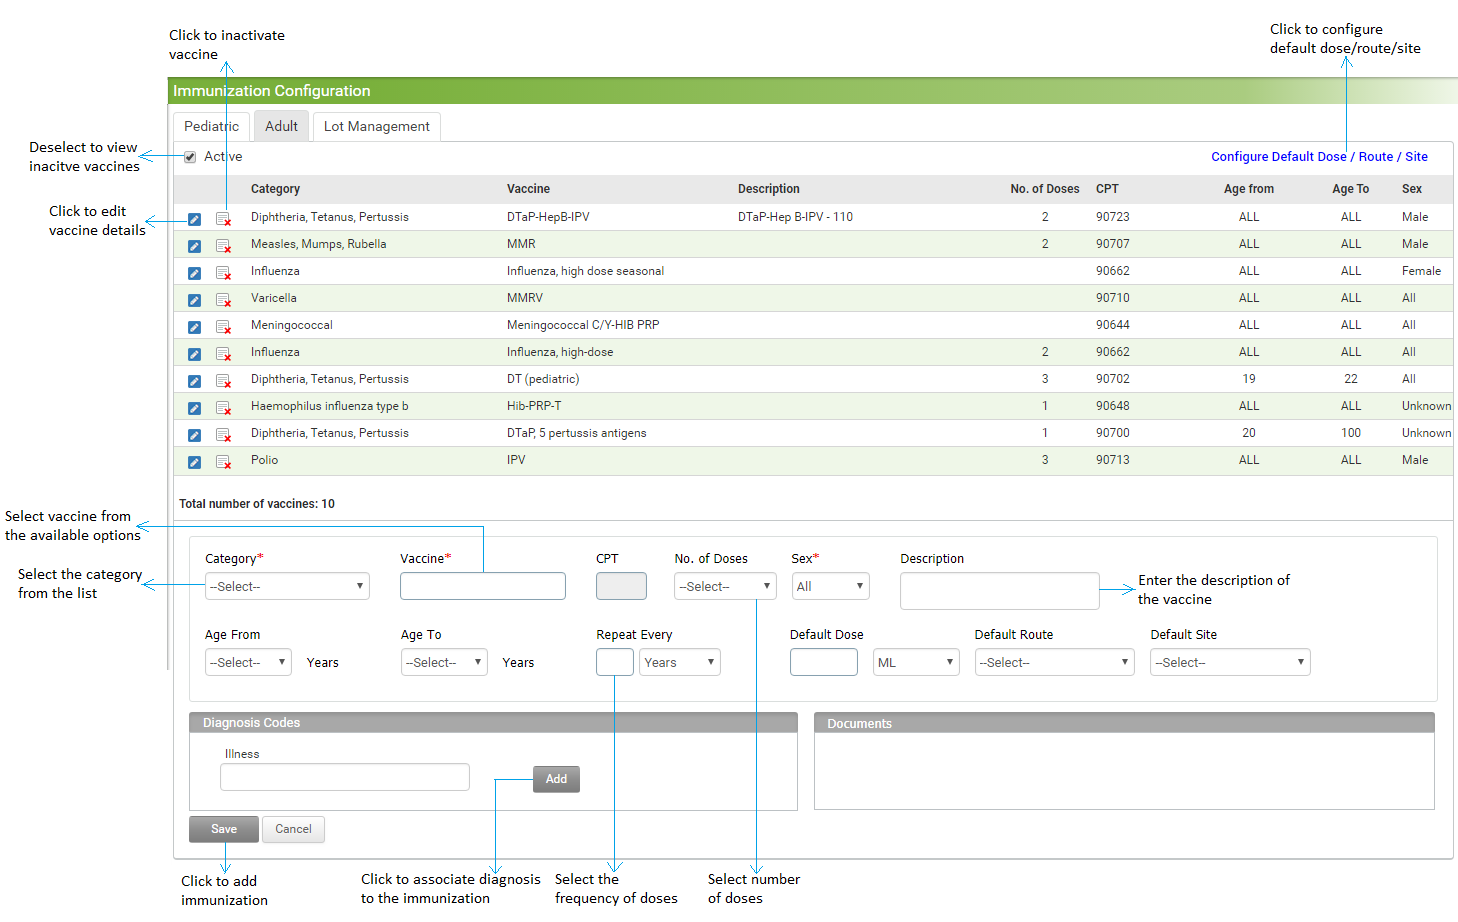
| 1. | On the Immunization Configuration Screen, click the Adult tab. The Adult tab is displayed with list of vaccines that are already configured. |
| 2. | In the section below the list, do the following: |
| • | Select the category form the drop down list. This field is mandatory. |
| • | Start typing the vaccine and select it from the list displayed. This field is mandatory. |
| • | To associate the specific CPT code with the vaccine, start typing the CPT code and select it from the list displayed, or click the  icon and select the CPT from the CPT Search screen. icon and select the CPT from the CPT Search screen. |
| • | Enter the number of doses to be given. |
| • | Select the Gender as Both, Male, or Female from the drop-down list. |
| • | Enter the details about the vaccine in the Description field, if needed. |
| • | Select the Age Option as All, Between, <=, <, =>, or > from the drop-down list. In the neighboring field, select an appropriate option as Years or Months using the drop-down list. Enter the age in the From and To fields accordingly to define the age range. This field is mandatory. |
| • | Enter the frequency in the Repeat Every field and select an appropriate option as Years or Months using the drop-down list. E.g., if 6 is entered and months is selected, it means the dose needs to be repeated every 6 months. |
| • | To associate a diagnosis to this vaccine, start typing the illness code or name and select it from the list. Click Add to add the diagnosis. Click this  icon to remove the diagnosis added. icon to remove the diagnosis added. |
| • | Click Save at the bottom of the screen. The Vaccine is added successfully. |
| 3. | In the Adult tab, click the  icon to edit the details of the selected immunization. To attach a document while editing, do the following: icon to edit the details of the selected immunization. To attach a document while editing, do the following: |
| • | In the Documents section, click Choose File to select a relevant file to attach. |
| • | Provide a relevant link in the Reference Links field, if necessary. |
| • | Click Attach Document. The file is added below. Once the file is attached, the relevant material is available for the particular immunization that is viewed in the Adult tab of Immunization Charting. To remove the file or link added, click remove. |
| 4. | Click the inactivate icon  to inactivate the vaccine. to inactivate the vaccine. |
| 5. | Deselect the Active check box to view the list of inactive records. Click the activate icon  to reactivate the corresponding record. to reactivate the corresponding record. |