Adding Notifications

Contents
To add notifications:
| 1. | From the left menu items, click Administration > Configuration > EMR > Notification. The Notification Configuration screen is displayed. |
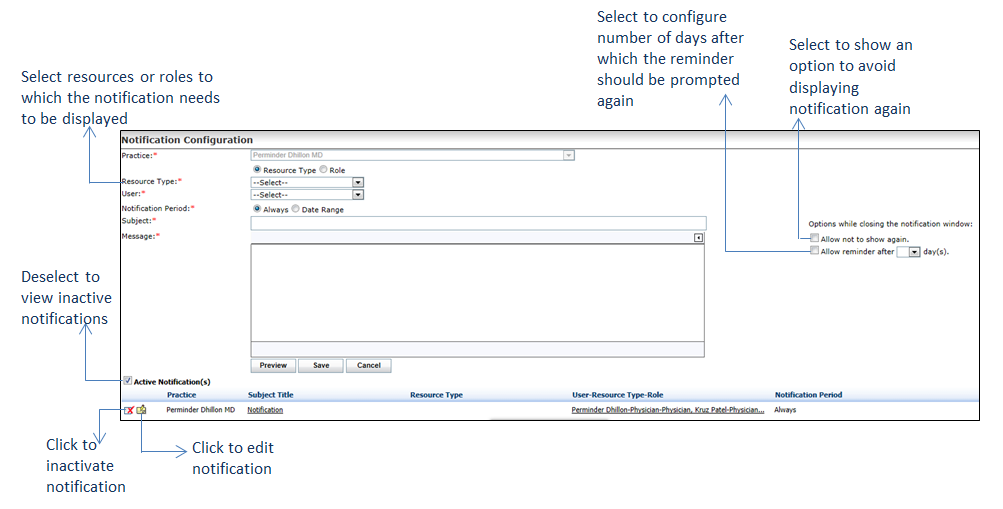
| 2. | On the Notification Configuration screen, do the following: |
| • | By default, the logged in Practice Name is selected. This field is disabled. |
| • | Select the Resource Type or Role option. This field is mandatory. |
| o | On selecting Resource Type option, select one or more resource types by selecting the appropriate check boxes from the drop-down list. This field is mandatory. |
| o | On selecting Role option, select one or more roles by selecting the appropriate check boxes from the drop-down list. This field is mandatory. |
| • | Depending on the option selected, the list of users is displayed in the drop-down list. Select one or more users by selecting the appropriate check boxes from the drop-down list. This field is mandatory. |
| • | Select one of the following options: |
| o | To send the notification every time a user logs in, select the Always option. |
| o | To send the notification for a particular time period, select the Date Range option and enter a date range. |
| • | To display the options while closing the notification window, do the following: |
| o | Select the Allow not to show again check box so that the Do not show again button is displayed along with the notification. On clicking the button, the notification will not be displayed while logging in again. |
| o | Select the Allow reminder after check box and then select the number of days between 1 and 10, to display the notification after the number of days selected. E.g., if the check box is selected and number of days is selected as 3, the Remind me after 3 day(s) button is displayed. On clicking the button, the notification will be displayed only after 3 days. |
| • | Type the message content in brief, in the Subject field. This field is mandatory. |
| • | Type the message content in detail, in the Message field. This field is mandatory. |
| • | To format the message content, click the |
| 3. | Click Preview to preview the notification. |
| 4. | Click CLOSE to close the preview screen. |
| 5. | Click Save. The notification is saved and added to the grid below. |
| 6. | In the Notification grid, do the following: |
| • | Move the mouse pointer over the subject title to view the message. |
| • | Move the mouse pointer over the record in the “User-Resource Type-Role” column to view the list of users who will receive the notification. |
| • | To edit the notification details, click the edit icon |
| • | To deactivate the notification details, click the deactivate icon |
| • | To reactivate the corresponding notification, deselect the Active Notification(s) check box and click the |
| • | If multiple notifications are created for a particuler user, the sequence in which the notification must be prompted can be set by clicking the |